Linux Permissions Explained

Reading File Permissions
Linux file permissions are broken down by User, Group, and Others. Permissions for read, write, and execute can be associated with each entity and are displayed as rwxrwxrwx.

As an example, take alternatives.log -- the first entry shown in the screenshot above. The file is owned by the root user and the root group. It's permissions are set as -rw-r--r--.
The first "-" we're going to ignore for now, and we'll focus on the rw-r--r-- section.
The can be interpreted as root (the user) can read and write this file, but not execute. Root (the group) can only read this file. Finally, others, which means anyone not the user or group, can only read the file.
Now that we can check the file permissions, what if we need to change them? First we'll change the user and group that owns the file, then we'll come back to the permissions.
Changing File Ownership
First, any given file or directory can have the owner user and group changed (assuming the account that's wants to do the changing has permission).
This can be accomplished by using the chown command.

I've created test.txt which is currently owned by the user cody and the group cody. I'm going to login as the root user and change the user that owns this file to root.

By running chown root test.txt the user that owns test.txt is now root, while the group is still cody. Alternatively, I could have run the command sudo chown root test.txt as the user cody, but I chose to login as the root user instead.
To change the group owner of the file you also use the chown command but instead in the following manner:
chown :newgroup filename
Changing File Permissions

We'll continue using the files under /var/tmp for now, but the same principles apply anywhere in the Linux filesystem.
Looking at test.txt as before, we see rw-r--r-- as the current file permissions. To change that, we have two options:
- Symbolic Mode
- Numeric Mode
Symbolic Mode
Symbolic mode allows you to edit file permissions by specifying the user, group, or others, and then adding or removing the desired permissions. This is accomplished using the chmod command. For example:
chmod u+x test.txt adds execute permissions for the user
chmod g-r test.txt removes group permissions for the group
The same result can also be accomplished the following syntax:
chmod u=rwx,go= test.txt

The benefit of modifying permissions this way is that there is no mistaking what permissions are being applied as the corresponding letters are present in the command.
Numeric Mode
Numeric mode accomplishes the same task as far as modifying permissions go, but with the primary benefit of speed. The associated command is often shorter as shown below.
chmod 777 test.txt keeps user with read, write, and execute but also adds read, write, and execute for group and others.

This change is reflected in the updated permissions shown here. But what's special about the number 777 that makes this change?
Each digit in 777 is representative of a set of permissions -- user, group, others.
Read = 4, Write = 2, and Execute = 1
Add the values together to make the desired set of permissions. For example:
621 = User has rw- permissions, Group has -w- permissions, and User has --x permissions.
File Type Indicator
You may remember that initial "-" we ignored at the beginning of this post. We ignored it because it's not necessarily permissions related, but it's good to keep an eye on especially if one of the less common indicators appears in its position. This tells you the file type you are dealing with. Let's look at our original screenshot.
Some of the most common indicators are:
- = regular file
d = directory
l = symbolic link
The Sticky Bit
The "sticky bit" originated in Unix and was originally used as a mechanism for executable to load faster by being cached in memory.
As time has gone on and Linux adopted the sticky bit, it's purpose has become quite different -- specifically that of ensuring files can only be deleted or renamed by their owners (and root). The sticky bit is configured on a directory and all files in that directory subsequently have the sticky bit enabled.
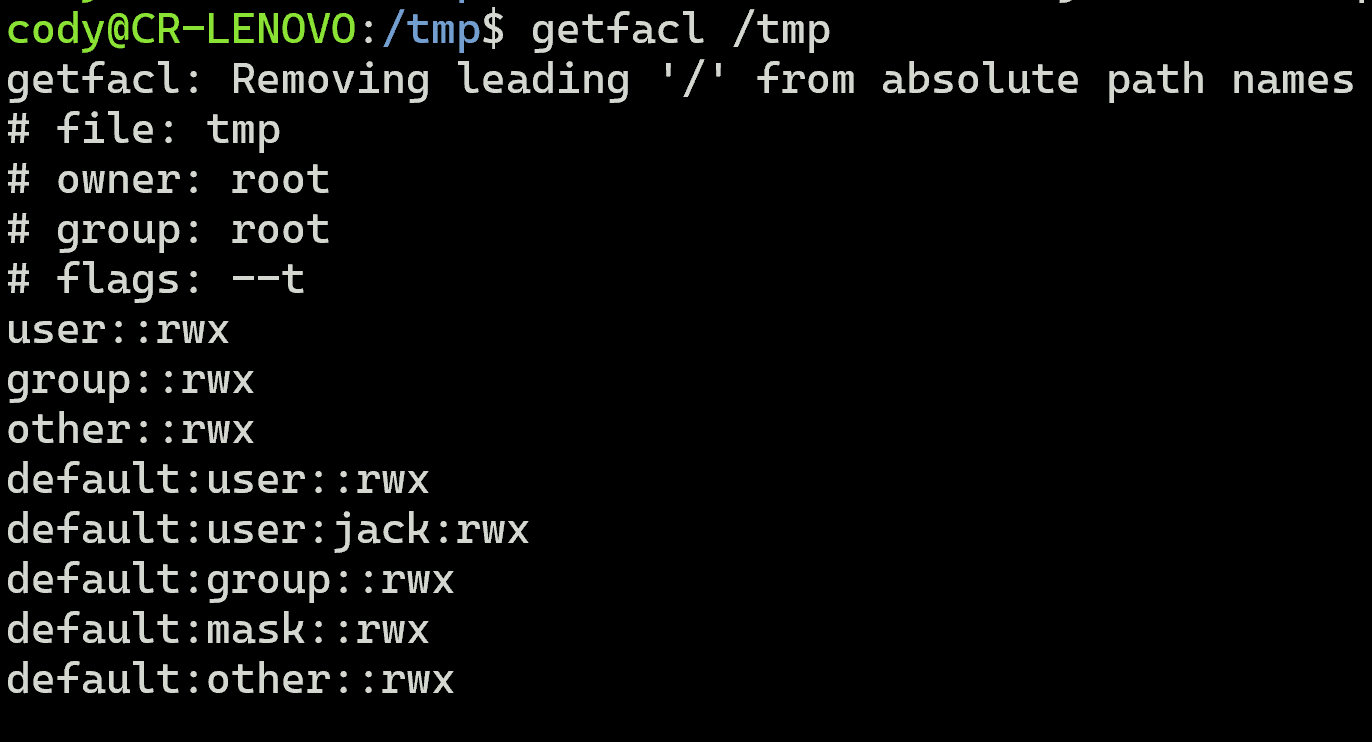
Setting the sticky bit can be accomplished with the chmod +t command and is represented by a "t" at the end of the listed permissions. I've included an example below showing the /tmp/ directory with the sticky bit enabled. This is enabled by default for this directory on Ubuntu and other Linux distributions as well.

Access Control Lists (ACLs)
Access Control Lists (ACLs) in Linux offer an additional method of viewing and modifying Linux file and directory permissions. These can be thought of not only an additional layer to the traditional permissions we've covered above, but the traditional permissions can also be modified using ACL related commands.
Two commands associated with ACLs are getfacl and setfacl. The former retrieving a file or directory's configured ACL, and the latter configuring the ACL. Here is what running getfacl on a test file I created looks like:

You can see how the permissions of user, group, and owner in the ACL match that of the traditional permissions.
Modifying Traditional Permissions with ACLs
Modifying the traditional permissions can be done with a command such as:
setfacl -m u::rw file_name
-m modifies the the ACL.
u::rw grants the User read and write access
file_name is the file being modified
(You may be wondering -- why the double colon "::" in that command? We'll get to that in a moment).
This command can be changed slightly by replacing u with g or o for Group or Owner, and then the desired permissions.
Granting Permissions to Specific Users or Groups
The primary benefit of ACLs is that additional layer of permissions I mentioned. ACLs allow you to add permissions for additional users and groups in addition to the owner user or group. This allows for various combinations of permissions to be set which can be good for customization, but can get complicated without proper management.

Using the same setfacl command we used earlier, but specifying a username between the double colons (::), we are now specifying a user to have these desired permissions. This goes beyond the traditional permissions and allows for a separate entry to be shown user:jack:rw- in the output of the ACL. Without the ACL, the only way to achieve these permissions for the user jack would be to make jack a part of the cody group, and assign the group read and write permissions.

setfacl -x u:jack test-file
We can see that the entry for jack in the ACL has been deleted.
Mask and Effective Permissions
Lastly, you may have noticed the mask entry in the ACL after we added the jack user. mask is the maximum allowed permission for any user or group added to the ACL that isn't the owner user or group. In our case, mask originally received rw permissions because that is what the jack user was assigned in the ACL. If we were to add another user or increase permissions for jack, the mask permissions would have expanded as well.
The mask permissions can be set with the following command:
setfacl -m m::rwx test-file

Notice here we are starting with a clean slate for an ACL, but have modified the mask to have rwx permissions. Any user or group that is now added to the ACL can have a maximum permission set of Read, Write, and Execute.
Let's see what happens if we add jack back to the ACL with rwx permissions, but also trim the mask permissions to just read.

We are now presented with Effective permissions. The jack user was assigned rwx permissions, but due to the mask permission set of r, jack actually only has r permissions.
Recursive Permissions and Default ACLs
Some additional points:
- All of what we've done can be done on directories as well. Unless configured to do so, this does not mean the files in that directory inherit the ACL though.
- If you want to set an ACL permission recursively on a directory to affect all files and subdirectories, this can be accomplished with the following (assigning rwx permissions to jack):
setfacl -R -m u:jack:rwx /tmp - If you want new files in a directory to inherit the permissions of the ACL of that directory, you must set a default ACL on that directory. This can be done with the following command:
setfacl -d -m u:jack:rwx /tmp
This actually produces another set of ACL entries which can be seen using the getfacl command.
Conclusion
As we've seen, ACLs allow for much greater flexibility than standard Linux permissions alone. Not only is this convenient, but it allows for better security as well since users don't need to be added to owner groups just to have access to a particular file.
This does come with learning some nuances around implementing and reading these additional permissions, but conquering the learning curve is well worth the benefits of the feature.

Comments
Post a Comment