How To Create a Home Lab with VirtualBox
The days of needing a 4 post rack (or a solid table), a spare room in your house, and an increased electric bill for a home lab are long gone. Between virtualization and the cloud, there are more options than ever to create a great home lab for minimal cost.
While I'm a fan of cloud resources, the free tiers on most cloud platforms can be limited or you have to be very careful what you enable so as not to get charged. It's for these reasons I'm going to stay away from the cloud for today -- I want this process to be completely free for anyone that wants a home lab.
This leaves us with a few options for virtualization. The most popular are VirtualBox, VMware, and Hyper-V. Hyper-V will require a Windows operating system, and VMware Workstation has changed in availability over the years and is currently a paid product. This leaves VirtualBox -- completely free, has most of the features available in the paid VMware Workstation, and will work on Windows, macOS, or Linux.
Let's get started.
Let's get started.
Step 1 - Download and Install VirtualBox
First we need to download and install VirtualBox. Head over to https://www.virtualbox.org/wiki/Downloads and download the package for your operating system.
 |
| VirtualBox Download Page |
While I install all components available, the ones necessary for this guide are:
- VirtualBox Networking
- VirtualBox Bridged Networking
- VirtualBox Host-Only Networking
Step 2 - Download and Install ISO(s)
While you can load any ISO you want, I'm going to stick with CentOS. Visit https://www.centos.org/download/, choose CentOS Linux DVD ISO, and download the ISO from your favorite mirror.
 |
| CentOS Linux DVD ISO |
 |
| Select Favorite Mirror Link |
Step 3 - Create Your Virtual Machines!
Launch VirtualBox and click New.

Name your virtual machine, select the folder where you'd like the VDI/VMDK file to be stored, and the Type and Version of OS you plan to run. In our case we're running CentOS 8 so I've selected Linux and Red Hat (64-bit).

In subsequent screens you'll need to select your file type (choose VDI if you plan to stick with VirtualBox, and VMDK if you suspect you may move to another hypervisor in the future). The amount of RAM and disk space you allocate depends on your resources, but I recommend at least 1GB of RAM and 10GB of drive space. The more the better, and a "fixed" file if you have the space to dedicate. The creation of the VM will take some time.


We're going to configure our machine to 1) have Internet connectivity and 2) allow the guest and host OSs to communicate with each other.
Under Adapter 1 > "Attached to" select NAT and then click the Port Forwarding button at the bottom.


In subsequent screens you'll need to select your file type (choose VDI if you plan to stick with VirtualBox, and VMDK if you suspect you may move to another hypervisor in the future). The amount of RAM and disk space you allocate depends on your resources, but I recommend at least 1GB of RAM and 10GB of drive space. The more the better, and a "fixed" file if you have the space to dedicate. The creation of the VM will take some time.

Step 4 - Configure Networking
Now that we have our virtual machine created, it's time to get it on a network. I'm going to continue with our single CentOS machine, but you can create as many as you want!
We're going to configure our machine to 1) have Internet connectivity and 2) allow the guest and host OSs to communicate with each other.
Under Adapter 1 > "Attached to" select NAT and then click the Port Forwarding button at the bottom.

- Name: Can be whatever you want.
- Protocol: TCP
- Host IP: Loopback address (127.0.0.1)
- Host Port: Can make this just about any port, but using anything 1024 or greater is recommended.
- Guest IP: The IP address of your virtual machine. This is the default network provided by VirtualBox so 10.0.2.15 should be your default guest IP. If you run into trouble, launch your guest machine and check the IP address and enter it here.
- Guest Port: 22
The configuration above will allow for port-forwarding from our host machine to our guest machine and allow access over SSH. If you want to use RDP to get to a Windows machine the Guest Port number will change, but it should be a similar configuration.
Step 5 - Install CentOS
Now we need to actually install the operating system. Until now we've just created the virtual machine file where the server will be run from. Select your virtual machine and click Settings.
Navigate to Storage and select Empty under the "Controller: IDE" storage device. Choose IDE Primary Master as your "Optical Drive", click the CD/DVD to the right and select Choose a disk file..., browse out to and select your ISO, and click OK.

Click Start. Now we can actually get started working in our virtual machine!

Your machine should now boot to the ISO and prompt you to begin the installation process. It is at this point you could get a variety of errors. The most common problem in my experience is VirtualBox doesn't know what to boot from, which means either something went wrong in an earlier step or your ISO is corrupted. If you're sure you've followed these steps, try re-downloading your ISO and verify the hash or at least filesize with the mirror site hosting the file.

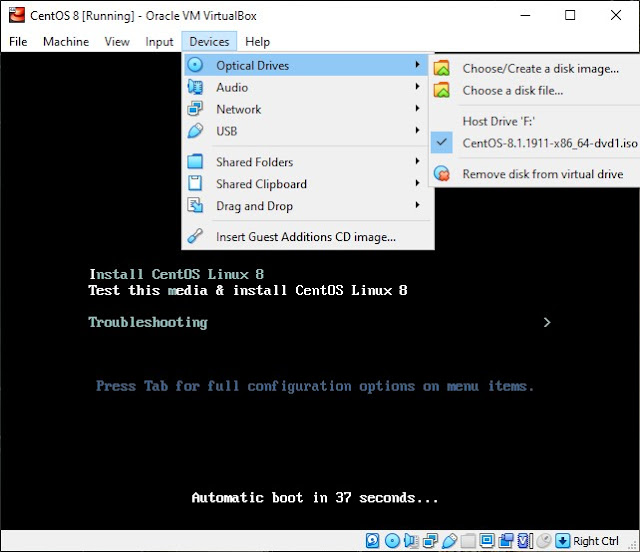
The rest of the OS install will of course vary depending on what you're installing. Once it's complete though you may need to point VirtualBox over to your VDI/VMDK file you created earlier. To do this click Devices > Optical Drives > Remove Disk from virtual drive. Then click Machine > Reset to restart the virtual machine. Otherwise the VM will keep booting to the installation ISO instead of the VDI/VMDK file.

You should now successfully boot into your virtual machine!

Step 6 - Verification
Our final step we need to verify that host-guest communication works as intended. Guest-guest communication won't be verified here as we only have one virtual machine.
As you can see here, I've used PuTTY on my host Windows machine to configure the connection to my guest CentOS machine.

Click Open and you will connect to your guest machine over SSH (after accepting the SSH server certificate - not pictured here, but just click "Yes" on the prompt)!

So we have host-guest communication. One more check to make -- Internet connectivity. Let's ping Google (8.8.8.8).

Success! You now have the beginning of a great home lab!

Comments
Post a Comment